Showing posts with label Martha Stewart. Show all posts

Thursday, June 28, 2012

Minnie Mouse 1st Birthday Party

Minnie Mouse first birthday table decorations and banner for my adorable niece.  I found two different size black pails from Hobby Lobby (the taller thin, were easier to work with)


Cricut "Mickey and Friends"
Minnie Mouse= 8"

Painted 2" and 3" Styrofoam balls with Martha Stewart paint in black

Summer Banner-Cricut "Mickey and Friends"
Minnie Ears 5"

Mickey and Friends Ears- 5"
Bow-3"
Font- Birthday Bash
Scallop- Ladybg-S= 5"
Font= Bees-S- 3"

We also had pom poms hanging over the table in pink, black and white


Pin It!

Thursday, May 19, 2011

Biome Ocean Project for Kids Elementary Class

My little friend is in 1st grade and had to do an ocean project in a box.  She chose to do it in a bankers box to give her a little more room.

I helped cut out the sea life animals using Life is Beach cartridge on my Cricut.  After cutting out all the die cuts, we ran them through the Xyron and then added all the different colors of Martha Stewart glitter.

I think she did a wonderful job putting together her project....(I know she must have the best project in class)

She then hung most of the fish and seahorse from fishing line to make them swim.


Shark, dolphin, octopus, crab, fish, seahorse, sun, waves, coral, seaweed, starfish, shells, clam, real rocks, and cotton balls for clouds


Love the way she leaned the octopus, and starfish on a real rock


Little crab with googly eyes, looks like Sebastian from Little Mermaid 


Placed a Martha Stewart pearl in the shell to make it look like a clam


Pink seahorse
Pin It!

Tuesday, March 22, 2011

Handmade Birthday Cards

Here are a couple easy handmade Happy Birthday cards to make.


Pin It!

Tuesday, February 8, 2011

Valentine's Card | S.W.A.K.- Glitter Lips

Here is a card I put together using 5" lips from "Love Struck" Cricut cartridge, and welded them together.  I then added Martha Stewart glitter, and cut out S.W.A.K. (sealed with a kiss) and also glittered them.


Inside I stamped and embossed with Stampin' Up.
Pin It!

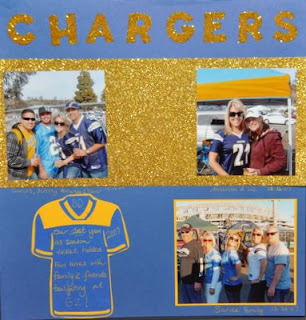
Simple & Quick Scrapbook Layouts

Since I am so behind on scrapbooking, just finished 2007, I have made very simple and quick layouts.


Pin It!

Sunday, November 28, 2010

Handmade Glitter Ornaments

Want to make a mess free sparkly glitter ornaments for Christmas? Then buy clear ornaments and gently remove the hanging part. Then I added some Mop & Glo and swirl it all around and empty into a glass. Leave ornament upside down until all the dripping has stopped.


Add any color of glitter inside. I prefer Martha Stewart fine glitter. She has so many pretty colors, and you can mix them together to create a new shade as well. Shake out excess glitter, and place top back on. The glitter looks clean and sparkly in the inside. I even added a some tulle bows to give it a little something extra. You can decorate with buttons, ribbons, rhinestones and so much more.


PS- Last year I glued glitter on the outside and it was messy and hard to hang the bulbs to dry.


Pin It!

Happy Thanksgiving 2010!

I hosted Thanksgiving this year for 26 family members.  We had a lot of fun, and since I am not a big cook, my MIL offered to make the Turkey, and I volunteered to decorate.  At the last minute (3 days in advance) my friend encouraged me to brine the turkey with her recipe.  She helped and did most the work since I hate to touch raw meat.


Before:
Doesn't it look pretty while brining? Soaking in apple juice, oranges, and a lot of fresh herbs.

After:
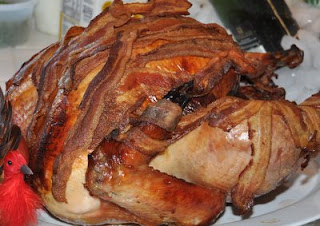
After an hour of cooking we pulled out the turkey and wrapped it with bacon.  I am so happy I did not burn it, it came out really juicy.


This is a cornucopia I put together for my head table.  I used Martha Stewart glitter on some of the vegetable to accent them.  We nicknamed the Turkey "red neck."

Dessert table set-up.  Valerie hand made all the mini-apple pies and they were delicious.  Poor thing was up until 3am the night before making 26 pies.  Each guest took one home.


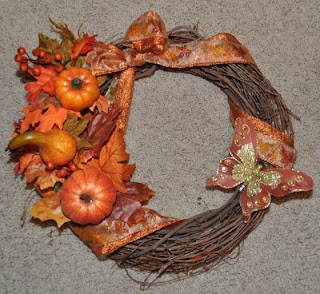
This wreath was extremely easy and inexpensive to make.  I made two for the front doors.
Pin It!

Monday, November 15, 2010

Halloween Costume...Barbie in a Box

In September we went to New York City and had an awesome vacation.  While I was there I went to FAO Schwartz and was able to customize my very own Barbie doll, she even came out on a runway for a fashion show.  Since I was creating the doll, I tried to make her look like me, and I even chose an outfit I might wear.


For our Annual costume party this year I wanted to be a little bit more creative (I refuse to buy a store bought costume in a bag).  I had the idea to be a life size Barbie in a box, and make her look like the doll I created in NYC.  After only having a week until our party I needed to move quickly.  Since I tend to be a perfectionist, and my box was having some issues, I realized I just had to deal with it.  


I bought the wardrobe box from U-Haul for about $12, then we cut it open and made a couple reinforcements with extra cardboard.  The piece on the left is going to become the door or the front to the box.


Then I primed the box and found Barbie wrapping paper, and lined the entire inside of the box (took 2 rolls).  I then took my NYC Barbie box to Home Depot to match the outside of the box perfectly the hot pink paint.


For the first time ever I figured out how to take an image into Illustrator and convert it into an SVG file for my Sure Cuts A Lot.  As you can see above the Barbie logo head and the Barbie font logo for the front were cut on SCAL, and backwards so the pink vinyl sticky side would be facing up as well as the Mattel logo (front and back).  I then used Martha Stewart Glitter and made a huge mess ;)  


We then added a clear shrink wrap package to the front, and a black belt for support to hold the box up and above my head, and the Barbie sign was to suppose to hide the black belt.  However, I forgot to make the belt smaller before getting into the box, so the box hung down low and rested on my head. As you will see I had to prop the box up with my arms.
And here is the final product.  I am really glad I did not spend more time making more details since I probably wore the costume for about 10 mins.


Out of my two brothers one really gets into Halloween as well and will get creative, the other one has no desire to dress up.  I really liked Derohn's Jack in the Box costume.  He made it out of paper mache, and even showed up with 40 tacos from Jack in the Box.


Here are some of the girls; Nas was Lucille Ball, Villy in black, was very clever as "static cling" and our very cute pregnant friend Alison was from Juno.  We had a great time!!!

Pin It!

Monday, August 23, 2010

5 Easy Steps to a Birthday Invitation...Fast and Easy to Make

I have been wanting to post this 30th birthday invitation I made for my SIL, but had to wait until her surprise birthday party was over, since she is a follower on my site.

This is a really easy birthday invitation to make. Here are the 5 simple steps.
1. Cut black cardstock at 5" x 7"
2. Cut white cardstock at 4.5" x 6.5"
3. Design wording in MS Word, run white paper thru printer
4. Use a punch out of a cupcake (I used the MS punch and cut black and pink glitter, then cut off pink tops and placed over black, also embossed black thru CB)
5. Adhere all layers


Pin It!

Sunday, August 8, 2010

10 year Reunion Scrapbook Layout

Here is a LO I made of my husband's 10 year HS Reunion, unfortunately I did not have any close ups of him, but some of the girlfriends of his good friends.  The HS colors were purple and yellow/gold, and yes it does look like the colors of the Lakers.

I used Storybook for the scalloped circle, and Stone Script for the letters, also included was a MS punch for the small flowers, and embossed with Cuttlebug "Seeing Dots" and "Swiss Dots." For the purple rhinestones I used Adirondack alcohol inks in Stream and Wild Plum to create a matching purple to my LO.  I also used Tattered Angels Glimmer Mist in Fully Purple and Gold to add color the flowers on the left.


Pin It!

Monday, June 7, 2010

Scrapbok Layouts

I have been on our annual houseboat trip at Lake Powell, UT. We had a great time and hopefully I can post a couple photos shortly.

Meanwhile here are a couple scrapbook pages I completed.

Martha Stewart punch to create the pink border, and SU Circle Circus then emboss with gold powder. Butterfly cut with MS punch on vinyl then peel sticky and used MS glitter.

Flowers were cut with AE starting at 1"-2 3/8" and I spaced them out and made 3 flowers.  Some I embossed with clear powder to give the shiny look, all embossed with CB Dots folder.


Pin It!

Saturday, March 6, 2010

Chicago Double Page Scrapbook Layout

Double Page Layout of my Chicago Trip.


Pin It!