Sunday, November 28, 2010

Handmade Glitter Ornaments

Want to make a mess free sparkly glitter ornaments for Christmas? Then buy clear ornaments and gently remove the hanging part. Then I added some Mop & Glo and swirl it all around and empty into a glass. Leave ornament upside down until all the dripping has stopped.


Add any color of glitter inside. I prefer Martha Stewart fine glitter. She has so many pretty colors, and you can mix them together to create a new shade as well. Shake out excess glitter, and place top back on. The glitter looks clean and sparkly in the inside. I even added a some tulle bows to give it a little something extra. You can decorate with buttons, ribbons, rhinestones and so much more.


PS- Last year I glued glitter on the outside and it was messy and hard to hang the bulbs to dry.


Pin It!

Happy Thanksgiving 2010!

I hosted Thanksgiving this year for 26 family members.  We had a lot of fun, and since I am not a big cook, my MIL offered to make the Turkey, and I volunteered to decorate.  At the last minute (3 days in advance) my friend encouraged me to brine the turkey with her recipe.  She helped and did most the work since I hate to touch raw meat.


Before:
Doesn't it look pretty while brining? Soaking in apple juice, oranges, and a lot of fresh herbs.

After:
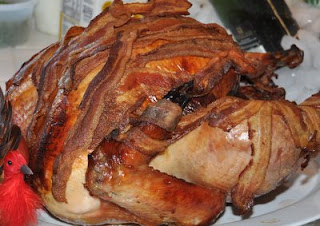
After an hour of cooking we pulled out the turkey and wrapped it with bacon.  I am so happy I did not burn it, it came out really juicy.


This is a cornucopia I put together for my head table.  I used Martha Stewart glitter on some of the vegetable to accent them.  We nicknamed the Turkey "red neck."

Dessert table set-up.  Valerie hand made all the mini-apple pies and they were delicious.  Poor thing was up until 3am the night before making 26 pies.  Each guest took one home.


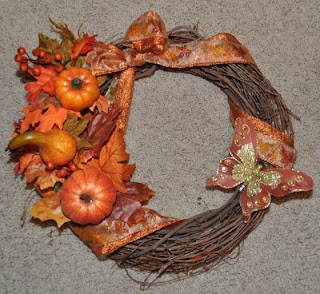
This wreath was extremely easy and inexpensive to make.  I made two for the front doors.
Pin It!

Friday, November 26, 2010

Baby Shower Onesie Card

I made this card for Alison's baby shower and had matching colors as the diaper cake.  I used design studio to weld the onesie card from Wall Decor and More.  Since that cart did not have a shadow effect I cut a second onesie for the top layer a little smaller then hand cut with scissors to make it fit.  I then ran it through the Cuttlebug and embossed the dots.  The font was welded from Storybook, added Glossy Accents and rhinestones, and I was done.


Pin It!

My First Diaper Cake...For Baby Sophia

This was my first attempt at making a diaper cake for my good friend Alison's Baby Shower.  I loved the way it turned out, and I think it really helped that Alison chose pink (my favorite color) and lime green for her new baby Sophia.  I bought items from her registry and either used them on the cake or inside the cake for more support.  Look closely at all the pictures and you may see her items.

I also used mostly Wall Decor on my Cricut cartridge for the baby items cut out, and my Cuttlebug to emboss.  Hope you enjoy!


Baby bottles, bottle brush, toys, blankets, diapers, pacifiers and more


Pin It!

Monday, November 15, 2010

Halloween Costume...Barbie in a Box

In September we went to New York City and had an awesome vacation.  While I was there I went to FAO Schwartz and was able to customize my very own Barbie doll, she even came out on a runway for a fashion show.  Since I was creating the doll, I tried to make her look like me, and I even chose an outfit I might wear.


For our Annual costume party this year I wanted to be a little bit more creative (I refuse to buy a store bought costume in a bag).  I had the idea to be a life size Barbie in a box, and make her look like the doll I created in NYC.  After only having a week until our party I needed to move quickly.  Since I tend to be a perfectionist, and my box was having some issues, I realized I just had to deal with it.  


I bought the wardrobe box from U-Haul for about $12, then we cut it open and made a couple reinforcements with extra cardboard.  The piece on the left is going to become the door or the front to the box.


Then I primed the box and found Barbie wrapping paper, and lined the entire inside of the box (took 2 rolls).  I then took my NYC Barbie box to Home Depot to match the outside of the box perfectly the hot pink paint.


For the first time ever I figured out how to take an image into Illustrator and convert it into an SVG file for my Sure Cuts A Lot.  As you can see above the Barbie logo head and the Barbie font logo for the front were cut on SCAL, and backwards so the pink vinyl sticky side would be facing up as well as the Mattel logo (front and back).  I then used Martha Stewart Glitter and made a huge mess ;)  


We then added a clear shrink wrap package to the front, and a black belt for support to hold the box up and above my head, and the Barbie sign was to suppose to hide the black belt.  However, I forgot to make the belt smaller before getting into the box, so the box hung down low and rested on my head. As you will see I had to prop the box up with my arms.
And here is the final product.  I am really glad I did not spend more time making more details since I probably wore the costume for about 10 mins.


Out of my two brothers one really gets into Halloween as well and will get creative, the other one has no desire to dress up.  I really liked Derohn's Jack in the Box costume.  He made it out of paper mache, and even showed up with 40 tacos from Jack in the Box.


Here are some of the girls; Nas was Lucille Ball, Villy in black, was very clever as "static cling" and our very cute pregnant friend Alison was from Juno.  We had a great time!!!

Pin It!

Friday, November 5, 2010

Scrapbook LO

Here are a couple layouts...


 The black flower above, is just tulle wrapped around a brad


I love pink, black, skulls and rhinestones...
Pin It!

Tuesday, November 2, 2010

Happy Halloween Banner

I made a quick and easy "Happy Halloween" banner with paper from Target's $1 bin.  They had really cute glitter paper, but it was a little thin and my paper curled a little.  The orange is vinyl cut with SCAL.


Pin It!